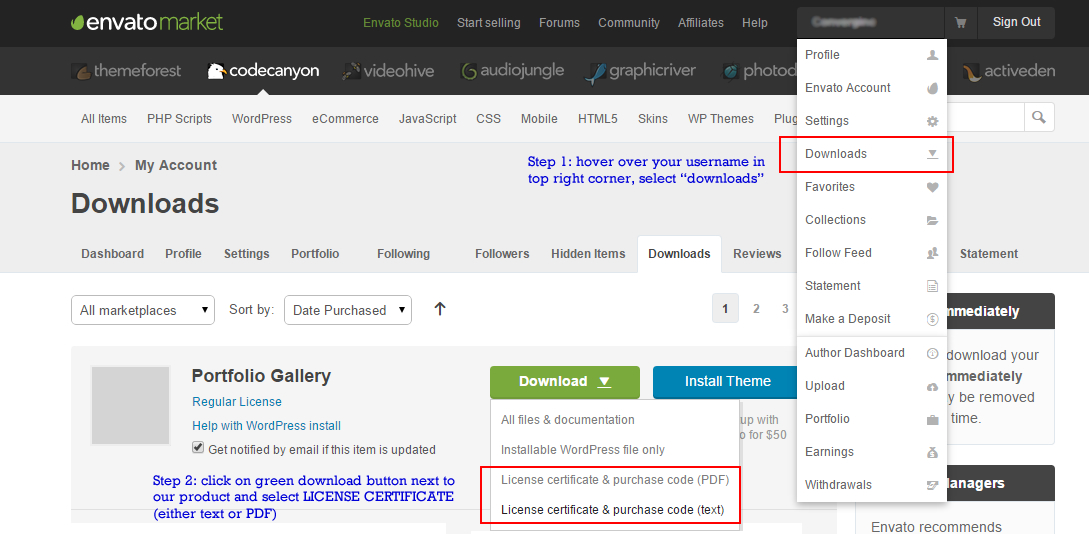
To find your licence key/purchase code you need to log into your CodeCanyon account and go to your “Downloads” page.
Locate our product you purchased in your “Downloads” list and click on the Download button and next click on the “License Certificate & purchase code (txt)” link in drop-down menu.
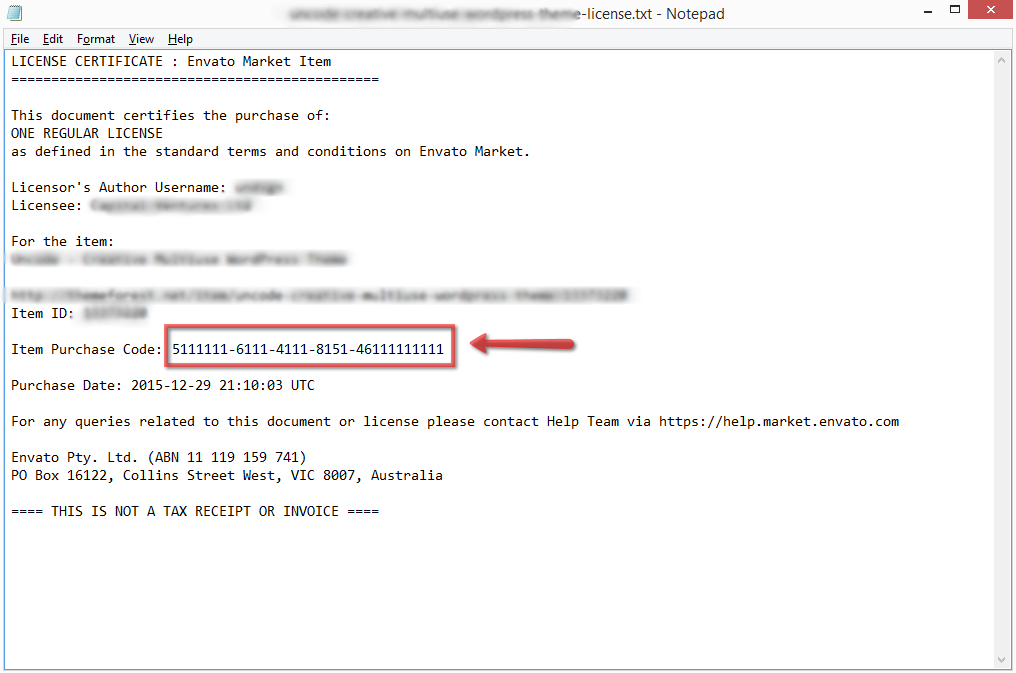
After you have downloaded the certificate you can open it in a text editor such as Notepad and copy the Item Purchase Code.
It means that either support period for entered license code has expired or that entered license code is invalid.
1) Please double check that you’re entering correct item purchase code – copy and paste it from license.txt (can be obtained from downloads section in your codecanyon.net profile)
2) if you’re copying it from the license file and it does not validate – most likely support period has ended. You can see if your support is still valid also in your downloads section on codecanyon.net (image below)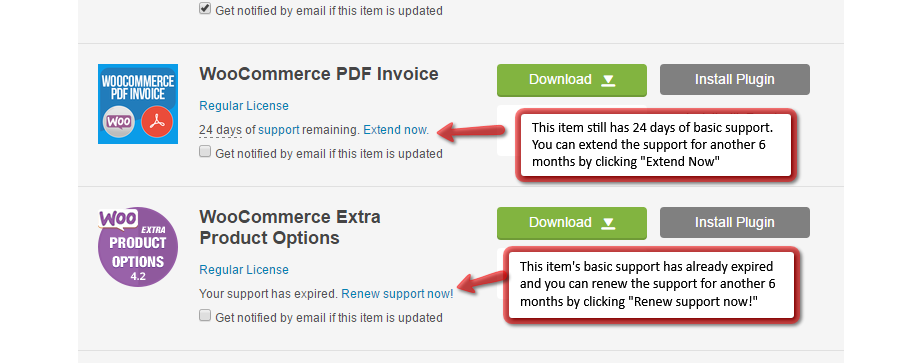
If support is expired – you have 2 options now:
1) extend or purchase basic support extension from Envato marketplace, which will then re-enable the ability to post basic support questions for you, or
2) purchase premium support package from us here
If your support period is still valid, and you still can’t post a support ticket – please send email to [email protected] and include item purchase code you’re having issue.
We certainly can, however it is not included in basic/complementary support. Each product comes with installation manual and if you follow instructions it should take you less than 5-10 minutes to install. If for some reason you don’t want to install it yourself or you have issues with installation which you don’t want to debug through support system, or you don’t want to spend time on looking for solution – we can install our product for you on your site however it will cost you $50 USD (paid upfront, non refundable, product must be purchased by you and valid product license must be provided along with FTP/MySQL access information). It is important to understand that this is only product installation, and not INTEGRATION into your site (by all means, it is not the same). If you have purchased premium support plan through our site and it is still valid (or still not used – in case of single support ticket) – we will install the product for you waiving the $50 installation fee.
Certainly! We can assist you with any custom development or custom design whether it is related to our products or not. Our standard hourly rate is $100 USD per/hour. Custom development estimates are provided through direct e-mail, you can send your technical description to [email protected] or fill out the contact form on our website. We will reply with a quote within 24-48 hours.
Most likely you are trying to login with your forum username and password. If this is the case – please use registration form and create new account instead. Old forum accounts were not moved to new support ticketing system.
If you’ve registered previously through support ticketing system and you cannot login – please use “forgot password” feature.
At this time – no. We sell exclusively through ENVATO marketplaces and each product installation must be accompanied with unique license key.
1 license key can be used only on 1 live instance of the product. If for example, you have installed our product for a client which no longer uses this product – you can remove the product from that customer site and install it for another client using the same license key.
We’re very sorry to hear that you’re not satisfied with our product!
Unfortunately, since all our products are digital – there are very specific cases when & why you can get refund for your purchases on Envato marketplaces. Please read them here: https://themeforest.net/page/customer_refund_policy
If you feel that your reason for refund is within applicable refunds terms – please request the refund through the codecanyon marketplace as explain on the link above.
Yes, you can change it here: Language file .lang.php
Yes, it is applicable to BookingWizz if you’re accepting payments using PayPal in our system.
BookingWizz uses IPN (Instant Payment Notification) from PayPal to update status of the booking to “Paid” once customer has paid using PayPal.
This article contains more information on what paypal is doing to IPN in 2016.
Next BookingWizz update will contain the necessary adjustments for this new requirements which will take effect in September 2016.
Unfortunately, there’s no ETA at this moment, as the next release for BookingWizz will be a major update we’re working on.
addType application/x-httpd-php .htm .html<?php include($_SERVER["DOCUMENT_ROOT"]."/booking/calendar.php"); ?>$description = (!empty($_REQUEST["description"])) ? (str_replace("'", "`", $_REQUEST["description"])) : '';
require_once("includes/config.php"), add a new variable like
$random =rand(10000,999999);
This will create a random number between 10000 and 999999.
You can also add some random letters for uniqueness. Then search for sendMail($adminMail in that file, and above the “found” string, you will see the $data variable with various values. Edit it by adding another line like that and use $random variable as value.
The text on the left side is the short code which can be used in emailTemplates/timeBookingConfirmationAdmin.php (timeBookingConfirmationCustomer.php, eventBookingConfirmationAdmin.php, eventBookingConfirmationCustomer.php) to send that variable to admin/customer.
$reqFields=array(

"name",

"phone",

"email",

"captcha"

);
Please make sure that the uploads folder (FTP -> root folder/booking/uploads/) has CHMOD 777 and check $baseDir in /booking/includes/dbconnect.php.
If you’re using filezilla to upload files to your ftp:
Connect your FTP client to your web server and then locate the /booking/uploads/ folder. In FileZilla, right-click the file on your web server and choose File Permissions to open the file attributes. Type the correct number in the Numeric Value text field.
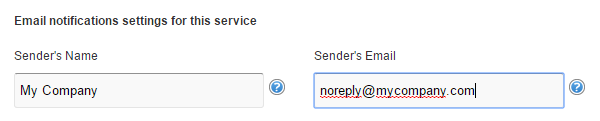
You can manage this information on a “per calendar” basis. First, login into your admin panel and open the settings of an already existing service. If you don’t have a service already in existence, create a new one to which you would like to add a name and an email. At the very bottom of service’s page you will find the “Email notifications settings for this service” (pic below) section which is in charge of a name and an email in notifications. Insert the desired name into the “Sender’ s Name” field and the email address into “Sender’s Email” field, then save the changes. Your customers will see them as “From” in all notifications associated with this service.
As we explained at the beginning of this document, it is very important to upload your Bookingwizz application (and/or your addon) to the correct location. If you don’t, it won’t work properly.
Since you are planning to operate your Bookingwizz application on your wordpress site, you will need to upload/move the “booking” folder to your wordpress root folder. Then you will upload the Bookingwizz for WordPress plugin into your WordPress plugins folder. The path for this is: /wp-content/plugins. To refresh your memory, see the documentation on Installing Bookingwizz for WordPress.
For example, if your wordpress site is installed in yourdomain.com/blog/ then you have to upload “booking” (BookingWizz standalone files) to yourdomain.com/blog/booking/ and then upload bookingwizz_wp folder to /blog/wp-content/plugins/ folder.
Say you’ve just uploaded your Bookingwizz program (or one of the addons) to your FTP files and it doesn’t seem to be working, you see blank pages. No need to panic; you have probably just encountered a corrupted download. Although it’s frustrating, it happens quite often, and it’s not your fault.
Most of the times this is fixed by re-downloading the files from CodeCanyon. Re-download the files and re-upload them to your FTP, all except the /booking/includes/dbconnect.php (if BookingWizz was installed already).
If, however, downloading/re-uploading won’t fix the issue, there may be a compatibility issue with the server and PHP errors are turned off in your case – you have to find error_logs (usually through the hosting control panel, or from hosting provider) and post them in support ticket – in order for us to assist you.
You can change it in /includes/header.php file https://prnt.sc/uqoqhb
You can change this conditions in main.php file
$sql = “SELECT * FROM {$db_pr}files ” . $filter . ” ORDER BY dateUploaded DESC LIMIT 10″;
Yes, you can add restricted file types in the settings.
Yes! With each purchase, you get 1 active license, so if you purchase script 3 times and install it in 3 different directories – then yes, you can have that ( domain.com/filemanager1 domain.com/filemanger2 etc)
In order to translate AFM, you have to edit every PHP file and change all text strings in each file to your language.
1) Double check that test emails didn’t go to spam folder – sometimes that happens.
2) Try using simple php mail() delivery method first.
3) Make sure you you’re using all the right ports/usernames/passwords – please double check with your provider.
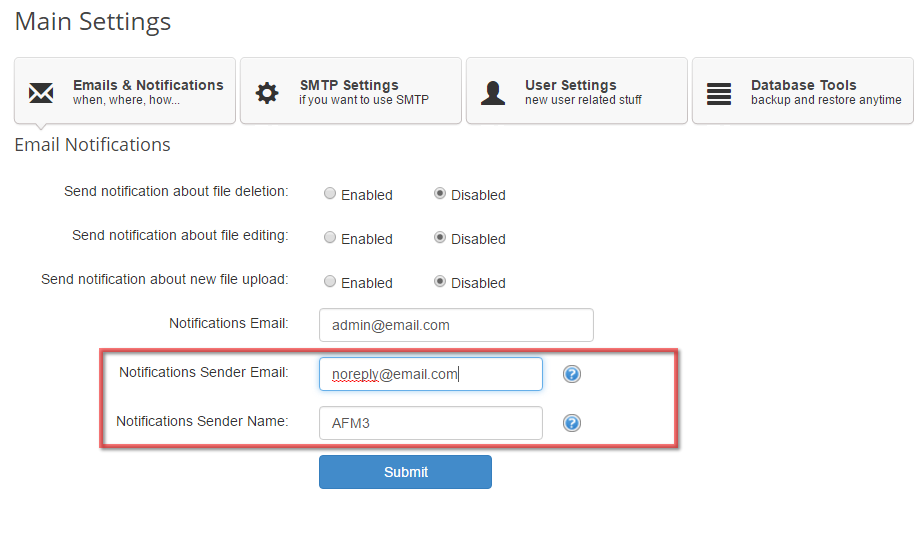
4) Make sure you have set Sender Email and Sender Name (image below) – if you will be using SMTP authentication, these 2 parameters HAVE to be the same as the name/email you’ll use to authenticate to SMTP.
 If above won’t help – it means that there is some incompatibility with mailing software we use and your server and it would require advanced troubleshooting
There is nothing you did wrong – this is how current system is setup to work, due to several reasons, including security concerns.
By default PHP allows to upload 2-8MB files only. AFM does not override PHP settings, so in order to upload larger files you have 2 options:
1) you can edit php.ini file if you have access to it and set upload_max_filesize -per your needs.
2) you can create .htaccess file with following contetns:
php_value upload_max_filesize 100M
php_value post_max_size 100M
php_value max_execution_time 200
php_value max_input_time 200
You will have to ensure that you are allowed to create and use such files with your hosting provider, we found that many times htaccess support is turned off by default, so you might need to ask hosting provider to enable it for you. Aslo, in case you get INTERNAL SERVER ERROR or blank page after adding code from option #2 above – it means that your hosting provider disabled option to change PHP config file through htaccess. You need to remove those lines you’ve added in htaccess and it will work fine again.
Alternatively, try removing php_value in front of all 4 lines – on some servers you have to use that instead of the above code.
Either 1 of the above options should solve your troubles with uploading.
This issue was happening in older AFM versions. Since v3.0 – if you did fresh install you shouldn’t see this happening.
For older versions: Please go to user management section and edit admin’s account – add everything you need (extensions, file size) and save it.
If both admin and customers don’t get email notifications from payment terminal there is a chance that your hosting provider is blocking those emails for some reason.
Here’s what you need to check:
If you will require further assistance – please open support ticket.
Like this:
You can edit style.css which is located here: yourdomain.com/wp-content/plugins/authorize_net_payment_terminal/terminal/style.css
Edit yourdomain.com/wp-content/plugins/authorize_net_payment_terminal/payment_terminal_transactions.php
Email template is located on lines 50 to 60.
To do any modifications with the form, you have to have at least basic knowledge of PHP. If you plan to record field values in db – then MySQL as well.
Form itself is located here yourdomain.com/wp-content/plugins/authorize_net_payment_terminal/terminal/index.php
You can open that file in your favorite code editing tool and add required form element either
by writing custom code, or just copy paste fields which are already added there. Again, you will have to read the code and understand it. If you don’t have any programming knowledge – please hire somebody to do the modifications for you ( we do provide such service as well, see “request modifications” section
Edit yourdomain.com/wp-content/plugins/authorize_net_payment_terminal/terminal/authorize/config.php
line 23 – controls payment page meta title ( <title></title> )
line 24 – controls the title above the payment form
Same file as in previous question, lines 260 to 279.
Since v1.1 you can simply add your own text in “thank you message” in plugin settings section – it will appear in customer email template and on thank you page after payment.
There are 2 emails like that. One goes to admin when recurring transaction is processed, and one when one-time transaction is processed.
For one-time, edit yourdomain.com/wp-content/plugins/authorize_net_payment_terminal/terminal/authorize/form.processing.php lines 236 to 257. you will see code like this, just edit the required text.
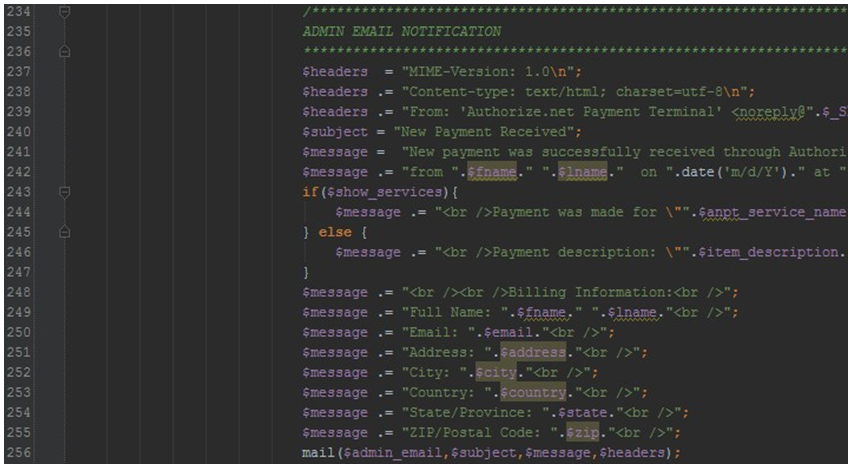
Also, please note, line 239 can be changed to your company name and email, so that emails would come from you, and not from your site default address:
Edit the line like this:
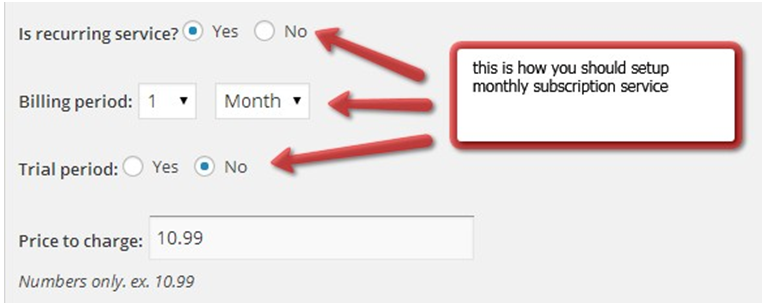
At the moment this product has following shortcodes:
– [pppt_paypalform sid=”service-id“] displays a form to pay for particular service, by id. You must replace bold text with number (ID of the service can be taken from services section in wordpress).
– [pppt_paypalform sid=”service-name“] same as above, but instead of service ID you can use service name.
– [pppt_paypalform] displays generic payment form with all the selected options in the settings.
You will need to edit yourdomain.com/wp-content/plugins/paypal_payment_terminal/paypal.ipn.php lines 40 to 51 for admin email and lines 59 to 68 for customer email. you will see code like this, just edit the required text.
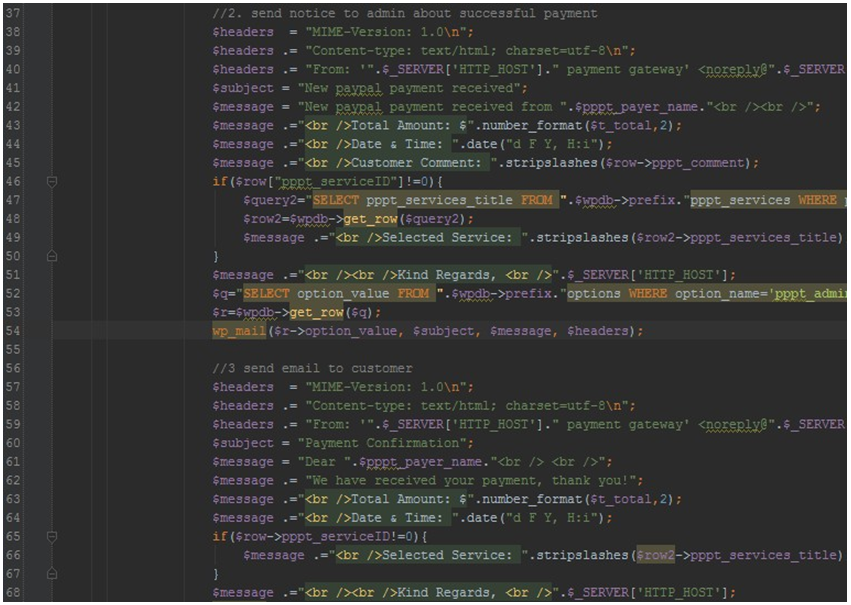
Also, please note, line 40 & 59 can be changed to your company name and email, so that emails would come from you, and not from your site default address:
Edit the line like this:
Like this:
You can edit style.css which is located here: yourdomain.com/wp-content/plugins/paypal_pro_wp/terminal/style.css
Edit yourdomain.com/wp-content/plugins/paypal_pro_wp/ payment_terminal_transactions.php
Email template is located on lines 57 to 69.
To do any modifications with the form, you have to have at least basic knowledge of PHP. If you plan to record field values in db – then MySQL as well.
Form itself is located here yourdomain.com/wp-content/plugins/paypal_pro_wp/terminal/index.php
You can open that file in your favorite code editing tool and add required form element either by writing custom code, or just copy paste fields which are already added there. Again, you will have to read the code and understand it. If you don’t have any programming knowledge – please hire somebody to do the modifications for you ( we do provide such service as well, see “request modifications” section
Edit yourdomain.com/wp-content/plugins/paypal_pro_wp/terminal/paypal/config.php
line 23 – controls payment page meta title ( <title></title> )
line 24 – controls the title above the payment form
Same file as in previous question, lines 291 to 310 for single time payments and 484 to 515 for recurring
There are 2 emails like that. One goes to admin when recurring transaction is processed, and one when one-time transaction is processed.
For one-time, edit yourdomain.com/wp-content/plugins/paypal_pro_wp/terminal/paypal/form.processing.php lines 267 to 286.
you will see code like this, just edit the required text.
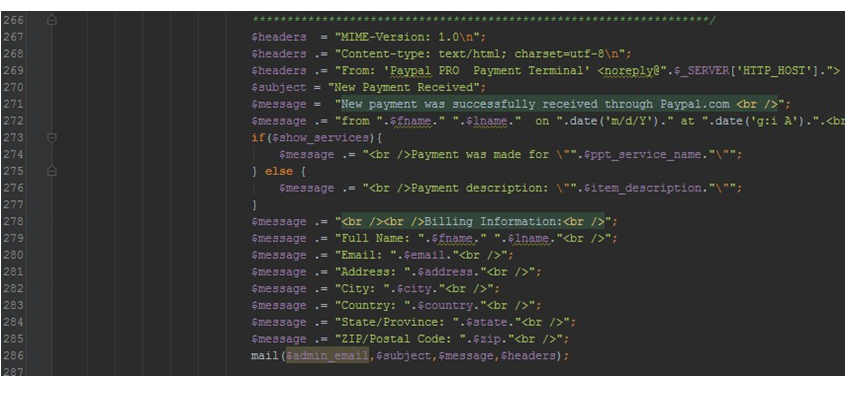
Also, please note, line 269 can be changed to your company name and email, so that emails would come from you, and not from your site default address:
Edit the line like this:
If you receive this message when doing tests/live charges with any of our stripe plugins/products – it means that your server has outdated security configuration and this has to be addressed to your hosting provider.
It means that your hosting provider will need to update your server configuration to accommodate Stripe’s security changes to support TLS 1.2.
This has to be done, otherwise – connections to Stripe’s servers from your server won’t work.
You can read more about these changes on stripe’s announcement here: https://stripe.com/blog/upgrading-tls
When you receive such error in live or test mode – it means that your website already has some plugin which uses Stripe library, and since our plugin uses the same Stripe library – there is a PHP conflict.
To fix this – you need to edit wp-content/plugins/stripe_payment_terminal/terminal/stripe/form.processing.php and comment out the line 169 which includes the Stripe.php library (just add two forward slashes like this // in front of the line 169.
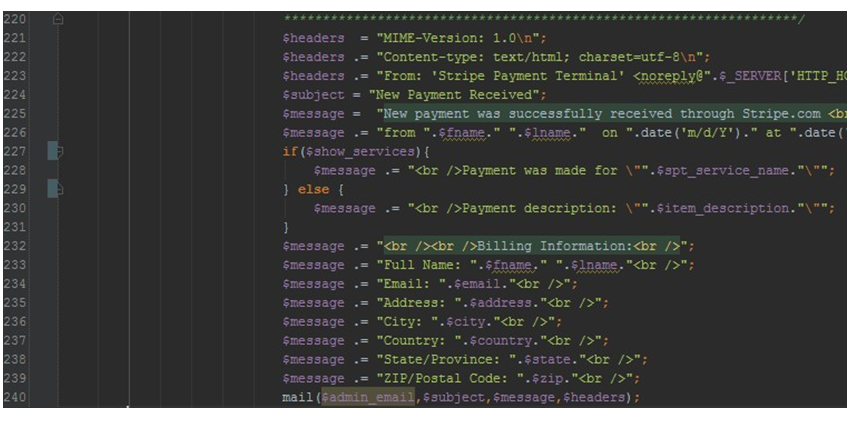
1. You will need to edit stripe_payment_terminal/terminal/index.php.
Billing information is located on lines starting from 194 to 495.
You can remove any fields you want. We would not recommend removing email field and customer’s first/last names, as those fields are used to send confirmation to customer.
2. You will also need to edit stripe_payment_terminal/terminal/stripe/form.processing.php and change line 67 – remove the variables $address $state and $city – if you will remove those fields from Billing Information. Delete || empty($address) || empty($state) || empty($city)
3. Final step is to adjust javascript validation in stripe_payment_terminal/terminal/stripe/javascript.validation.php – edit lines 25 to 32 – remove the variables for which you’ve deleted fields from billing information block. ( example: if you’re leaving just customer’s name and email $reqFields should look like this: $reqFields=array("fname","lname","email"); )
Like this:
You can edit style.css which is located here: yourdomain.com/wp-content/plugins/stripe_payment_terminal/terminal/style.css
Edit yourdomain.com/wp-content/plugins/stripe_payment_terminal/payment_terminal_transactions.php
Email template is located on lines 35 to 40.
To do any modifications with the form, you have to have at least basic knowledge of PHP. If you plan to record field values in db – then MySQL as well.
Form itself is located here yourdomain.com/wp-content/plugins/stripe_payment_terminal/terminal/index.php
You can open that file in your favorite code editing tool and add required form element either
by writing custom code, or just copy paste fields which are already added there. Again, you will have to read the code and understand it. If you don’t have any programming knowledge – please hire somebody to do the modifications for you ( we do provide such service as well, see “request modifications” section
Edit yourdomain.com/wp-content/plugins/stripe_payment_terminal/terminal/stripe/config.php
line 23 – controls payment page meta title ( <title></title> )
line 24 – controls the title above the payment form
Same file as in previous question, lines 245 to 263.
There are 2 emails like that. One goes to admin when recurring transaction is processed, and one when one-time transaction is processed.
For one-time, edit yourdomain.com/wp-content/plugins/stripe_payment_terminal/terminal/stripe/form.processing.php lines 220 to 239.
you will see code like this, just edit the required text.
Also, please note, line 223 can be changed to your company name and email, so that emails would come from you, and not from your site default address:
Edit the line like this:
Please make sure that allow_url_fopen is enabled on your server. Please contact hosting provider to confirm this.
After October 31, 2016, any customer who is sending transactions via a SHA 1 connection and/or lower than TLS 1.2 through Elavon will not be able to process payments (You can read about SHA2/TLSv1.2 here).
We will release an update to the CCWP by the end of October, in the meantime in order to comply with Elavon/Converge requirements for SHA2 TLS 1.2 – you have to change following in your Credit Card Payments WordPress plugin code:
1) Open wp-content/plugins/payment_terminal_pro/terminals/elavon/includes/config.php with any text editor and change line 46 and 48 as per below:
WAS
Line 46 – define(‘GATEWAY_URL’,’https://demo.myvirtualmerchant.com/VirtualMerchantDemo/process.do’);
Line 48 – define(‘GATEWAY_URL’,’https://www.myvirtualmerchant.com/VirtualMerchant/process.do’);
SHOULD BE
Line 46 – define(‘GATEWAY_URL’,’https://api.demo.convergepay.com/VirtualMerchantDemo/process.do’);
Line 48 – define(‘GATEWAY_URL’,’https://api.convergepay.com/VirtualMerchant/process.do’);
2) Now open wp-content/plugins/payment_terminal_pro/terminals/elavon/includes/elavon.class.php and add below code on line 88 (line 88 is empty line, above $response_data = curl_exec($ch); )
curl_setopt($ch, CURLOPT_SSLVERSION, 6); // forces curl to use TLS 1.2
3) In addition to the above – you will need to ensure that your hosting has latest CURL module with TLS v1.2 support. If after above changes your live transactions won’t go through and will timeout, most likely the issue is in CURL on your server not supporting TLS v1.2 and you will need to rectify this with your hosting provider.
After October 31, 2016, any customer who is sending transactions via a SHA 1 connection and/or lower than TLS 1.2 through Elavon will not be able to process payments (You can read about SHA2/TLSv1.2 here).
We will release an update to the Elavon Payment Terminal by the end of October, in the meantime in order to comply with Elavon/Converge requirements for SHA2 TLS 1.2 – you have to change following in your Elavon Payment Terminal code:
1) Open elavon_payment_terminal/includes/config.php with any text editor and change line 46 and 48 as per below:
WAS
Line 46 – define(‘GATEWAY_URL’,’https://demo.myvirtualmerchant.com/VirtualMerchantDemo/process.do’);
Line 48 – define(‘GATEWAY_URL’,’https://www.myvirtualmerchant.com/VirtualMerchant/process.do’);
SHOULD BE
Line 46 – define(‘GATEWAY_URL’,’https://api.demo.convergepay.com/VirtualMerchantDemo/process.do’);
Line 48 – define(‘GATEWAY_URL’,’https://api.convergepay.com/VirtualMerchant/process.do’);
2) Now open elavon_payment_terminal/includes/elavon.class.php and add below code on line 91 (line 91 is empty line, above $response_data = curl_exec($ch); )
curl_setopt($ch, CURLOPT_SSLVERSION, 6); // forces curl to use TLS 1.2
3) In addition to the above – you will need to ensure that your hosting has latest CURL module with TLS v1.2 support. If after above changes your live transactions won’t go through and will timeout, most likely the issue is in CURL on your server not supporting TLS v1.2 and you will need to rectify this with your hosting provider.
